Corridor mode is a really useful feature available on many different CCTV cameras that can be utilised to effectively monitor a space that is more vertical, rather than horizontal, in shape. These types or areas include hallways, pathways, staircases, shopping aisles, tunnels and roads. When installing and viewing a CCTV camera, you want the image frame to include as much of the area of interest, while cutting out as much of the redundant areas, like the walls and ceiling, as possible. Corridor mode allows you to rotate the camera’s lens and the video image 90 degrees so that it’s in a portrait, rather than a landscape format. As a result, you can use the camera to really focus on those areas of interest of within in your frame changing the image’s aspect ratio from 16:9 to 9:16 to suit narrow monitoring settings. The image below is taken from a camera making use of this function and illustrates the differences between the corridor and standard settings:

This guide will show you how to utilise corridor mode on Hikvision’s three most popular camera types: domes, turrets, and bullets. I will cover how to activate this useful setting in iVMS-4200, a browser, and locally through your NVR's GUI so that, irrespective of your setup, this guide should be of help.
Contents:
Part 1: How do I activate the corridor mode function in my camera’s settings?
Part 1: How do I activate the corridor mode function in my camera’s settings?
We suggest getting your camera set up on your network and activating corridor mode in its settings before you try to rotate and position the lens. This way, you can use the live video stream, in the correct aspect ratio, to point the lens in your optimum direction. Positioning the lens often involved a bit of trial and error to get the best result specific to your space.

Locally (via a monitor connected to an NVR):
If your camera is connected to an NVR, then you can easily configure corridor mode in the setting through the NVR’s GUI menu. Just Navigate to:
Menu > Camera > Image
Pick your camera from the top drop-down box beside Camera and then select “Clockwise 270 degrees” in the Enable Image Rotation box
Then, just click Apply
Through iVMS-4200:
If you’re not using an NVR, or don’t have easy access to your NVR’s GUI, then an option is to use iVMS-4200 to set up corridor mode by accessing the camera directly.
To do this, first, you’ll need to navigate to:
Menu > Device Management

Find your camera in the device list. If accessing a camera connected to an NVR, you’ll need to open your NVR within the Group section of the Device Management screen and then the particular camera within the NVR’s device list.
Click Configure (the small cog) on your camera.
If your camera isn’t connected to an NVR, then open Basic Settings, if it is then open Advanced Function.

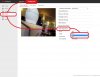
In the popup window, open the Image tab in the sidebar. You should then see either a tick-box or drop-down that allows you to turn on Rotate, tick or select ON in the applicable box or drop-down and then Save. The camera view should now have been rotated.

.jpg")
In a web browser:
The other method commonly used to access cameras and NVRs is through a web browser. You will only be able to configure the image rotation settings for a remote camera. The image for cameras connected directly to an NVR cannot be rotated in this menu due to the restricted access to the camera’s settings.
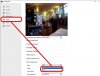
To access your camera in a browser, simply input its IP address into the browser’s address bar and hit enter. You’ll be taken to a login screen, here you’ll need to fill out the username and password combination you created for the camera when you first set it up. If correct, you should be taken to a page displaying the camera’s live video stream.
The process of rotating the camera’s image is relatively similar to that in iVMS-4200, just go to:
Configuration > Image > Video Adjustment > Rotate > On
The setting should be automatically saved, you’ll see a popup in the bottom-right corner of your window confirming this. That’s it!
.jpg")
Part 2: How do I position and rotate my camera’s lens correctly?
Rotating the camera’s image through its settings will rotate the image 270 degrees. To rotate the final video stream to the desired 180 degrees, you will manually need to turn the camera’s lens 90 degrees in the opposite direction as compensation. The entire process allows the rotated image to properly fit a 9:16 portrait aspect ratio. You’ll need to follow the below steps in order to rotate the camera’s lens.
For Domes / Mini Domes:
Domes and mini domes are the fiddliest type of camera to move and rotate the lens on. You can do this with the camera either installed or taken down. You’ll need to take the outer casing off the dome first to allow you to move the lens inside. Then, loosen the locking screw located to the right of the lens rotate to allow you to move the lens and bracket. Now twist the lens bracket (the bit that can turn surrounding the lens, see the picture below) 90 degrees anti-clockwise, so that the gap in it is in the 3 o’clock position. You should see the “90” marker in the middle of the gap once in this position. Now twist the lens (see the picture below) 90 degrees anti-clockwise, holding the lens bracket in place while doing this helps, so the “90” marker is at 12 o’clock and the “0” marker is in the 3 o’clock position. It may take a bit of wiggling and feel unnatural but the lens will move to this position, you won’t break anything!
.jpg")
Finally, rotate the lens bracket 90 degrees clockwise so that the gap is at 6 o’clock, and then move the lens so that is fits into this gap, so it looks like the picture below. This next stage takes a bit of trial and error on your part to get your desired camera view. You’ll need to fiddle around with the lens while looking at the camera’s live stream to ensure it is straight and something you’re happy with. Viewing your stream through iVMS-4200 or Hik-Connect is best as you can look at the image and remotely while fiddling with the lens position at the same time.

For Turrets:
Rotating the lens on a turret camera is a slightly more straightforward process. First, you’ll need to remove the trim ring (shown in the picture below) by twisting it anti-clockwise and lifting it off the base of the camera.

This should expose the locking screw, you’ll need to loosen this using a Phillips-head screwdriver enough for Turret’s ball to be rotated. You shouldn’t need to take the screw out entirely. All these parts are labeled in the picture below. The “UP” marker on the ball indicates the top of the camera. You’ll now need to rotate the ball 90 degrees anti-clockwise so that this marker moved from the 12 o’clock to 9 o’clock position. Now, tighten the locking screw back up and replace the trim ring to its original position. The lens should now be appropriately rotated.

For Bullets and Mini Bullets:
The camera models that allow for the easiest rotation of their lenses are bullets and mini bullets.
It is important to note that the sun shield on these cameras cannot be moved to be above the lens when rotated, which presents a drawback so using them for corridor mode. The sun shield will sit to the side of the rotating lens in this case so you’ll need to make sure that you shelter the camera somewhat (such as under the eaves of a roof) if setting a bullet or mini bullet for corridor mode.
Mini bullets have a locking nut (shown below) at the end of their base which will allow you to rotate the camera when loosened. Larger bullets will require you to loosen the locking screw, which is the screw furthest to the right of the base if looking at them (shown below).
Once you’ve loosened the locking screw/nut as appropriate, rotate the main body of the camera 90 degrees anti-clockwise, so that the sun shield is in the 9 o’clock position. This will rotate the lens. Once you’ve done this, tighten the screw or nut again to secure the camera in its newly rotated position.
.jpg")
.jpg")
Part 3: How do I change the layout of my camera streams to accommodate for corridor mode?
Once your camera is all set up in corridor mode, you’ll want to be able to adjust the way that you view the grouped cameras to avoid the camera’s live stream being reduced in size to fit the standardised landscape 16:9 frame. This is easily done by simply merging two of the landscape frames to make a portrait, 9:16 frame to which you can dedicate your camera. This custom view layout can be set up in an NVRs local GUI and in iVMS-4200. Please see the guides below for an explanation on how to customise your stream layout to accommodate corridor mode.
In iVMS-4200:
Click on the small icon made up of several small boxes at the bottom of your Main View screen in the program, this should bring up the window division page. Click Add to create a Custom Window Division.

In the Add Custom Window Division popup, set the name and dimensions of your new stream layout as desired.
Now, click and drag your mouse over the two frames you want to merge to select them both. Once they’ve both been highlighted by a surrounding red box, click Joint to merge them. Now click Save.

Once back in the Main View, click on the Window Division icon in the bottom right-hand corner again and select your new custom layout from the list. Your new stream layout should load ready for you to assign the individual cameras to.

Locally through your NVR’s GUI:
Please Note - This option is only available on NVRs that are running Version 4 firmware. There is not currently an option to customise your stream layout on K-Series recorders. If you're running Version 3 firmware then your only option is to configure your layout as per above in iVMS-4200.
It’s also useful to be able to customise the stream layout as viewed directly from your NVR’s GUI as this is many people’s preferred method for observing and configuring their camera feeds.
To do this, firstly, you’ll need to navigate to:
Configuration > Live View > View > Set Custom Layout (small cog in bottom-left hand corner)

In the Custom Layout Configuration popup, set the name and dimensions of your new stream layout as desired. Now, click and drag your mouse over the two frames you’re going to merge and click the Joint button in the top toolbar, followed by Save.

Once back in the Live View, click on the Split button in the bottom-right hand corner of your screen. Then, select your new custom layout from the Custom Layout list that appears to load your new stream layout. You can then add the camera streams to each frame as appropriate.

You should now be up and running with corridor mode set up properly on your camera! Feel free to start a new thread or comment below with any other questions or suggestions. Thanks for reading!
This guide will show you how to utilise corridor mode on Hikvision’s three most popular camera types: domes, turrets, and bullets. I will cover how to activate this useful setting in iVMS-4200, a browser, and locally through your NVR's GUI so that, irrespective of your setup, this guide should be of help.
Contents:
Part 1: How do I activate the corridor mode function in my camera’s settings?
- Locally (via a monitor connected to an NVR)
- Through iVMS-4200
- Through a browser
- For Domes/Mini Domes
- For Turrets
- For Bullets
- On an NVR’s local GUI
- On iVMS-4200
- On a browser
Part 1: How do I activate the corridor mode function in my camera’s settings?
We suggest getting your camera set up on your network and activating corridor mode in its settings before you try to rotate and position the lens. This way, you can use the live video stream, in the correct aspect ratio, to point the lens in your optimum direction. Positioning the lens often involved a bit of trial and error to get the best result specific to your space.
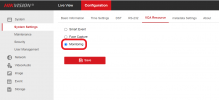
Note - For the G2 AcuSense models, you will need to connect to the camera directly in a web browser and change the "VCA Resource" to Monitoring Mode by navigating to:
Configuration → System→ System Settings → VCA Resource
Please note that this will disable most of the smart event options, leaving only Scene Change Detection available to use.
Locally (via a monitor connected to an NVR):
If your camera is connected to an NVR, then you can easily configure corridor mode in the setting through the NVR’s GUI menu. Just Navigate to:
Menu > Camera > Image
Pick your camera from the top drop-down box beside Camera and then select “Clockwise 270 degrees” in the Enable Image Rotation box
Then, just click Apply
Through iVMS-4200:
If you’re not using an NVR, or don’t have easy access to your NVR’s GUI, then an option is to use iVMS-4200 to set up corridor mode by accessing the camera directly.
To do this, first, you’ll need to navigate to:
Menu > Device Management
Find your camera in the device list. If accessing a camera connected to an NVR, you’ll need to open your NVR within the Group section of the Device Management screen and then the particular camera within the NVR’s device list.
Click Configure (the small cog) on your camera.
If your camera isn’t connected to an NVR, then open Basic Settings, if it is then open Advanced Function.
In the popup window, open the Image tab in the sidebar. You should then see either a tick-box or drop-down that allows you to turn on Rotate, tick or select ON in the applicable box or drop-down and then Save. The camera view should now have been rotated.
In a web browser:
The other method commonly used to access cameras and NVRs is through a web browser. You will only be able to configure the image rotation settings for a remote camera. The image for cameras connected directly to an NVR cannot be rotated in this menu due to the restricted access to the camera’s settings.
To access your camera in a browser, simply input its IP address into the browser’s address bar and hit enter. You’ll be taken to a login screen, here you’ll need to fill out the username and password combination you created for the camera when you first set it up. If correct, you should be taken to a page displaying the camera’s live video stream.
The process of rotating the camera’s image is relatively similar to that in iVMS-4200, just go to:
Configuration > Image > Video Adjustment > Rotate > On
The setting should be automatically saved, you’ll see a popup in the bottom-right corner of your window confirming this. That’s it!
Part 2: How do I position and rotate my camera’s lens correctly?
Rotating the camera’s image through its settings will rotate the image 270 degrees. To rotate the final video stream to the desired 180 degrees, you will manually need to turn the camera’s lens 90 degrees in the opposite direction as compensation. The entire process allows the rotated image to properly fit a 9:16 portrait aspect ratio. You’ll need to follow the below steps in order to rotate the camera’s lens.
For Domes / Mini Domes:
Domes and mini domes are the fiddliest type of camera to move and rotate the lens on. You can do this with the camera either installed or taken down. You’ll need to take the outer casing off the dome first to allow you to move the lens inside. Then, loosen the locking screw located to the right of the lens rotate to allow you to move the lens and bracket. Now twist the lens bracket (the bit that can turn surrounding the lens, see the picture below) 90 degrees anti-clockwise, so that the gap in it is in the 3 o’clock position. You should see the “90” marker in the middle of the gap once in this position. Now twist the lens (see the picture below) 90 degrees anti-clockwise, holding the lens bracket in place while doing this helps, so the “90” marker is at 12 o’clock and the “0” marker is in the 3 o’clock position. It may take a bit of wiggling and feel unnatural but the lens will move to this position, you won’t break anything!
Finally, rotate the lens bracket 90 degrees clockwise so that the gap is at 6 o’clock, and then move the lens so that is fits into this gap, so it looks like the picture below. This next stage takes a bit of trial and error on your part to get your desired camera view. You’ll need to fiddle around with the lens while looking at the camera’s live stream to ensure it is straight and something you’re happy with. Viewing your stream through iVMS-4200 or Hik-Connect is best as you can look at the image and remotely while fiddling with the lens position at the same time.
For Turrets:
Rotating the lens on a turret camera is a slightly more straightforward process. First, you’ll need to remove the trim ring (shown in the picture below) by twisting it anti-clockwise and lifting it off the base of the camera.
This should expose the locking screw, you’ll need to loosen this using a Phillips-head screwdriver enough for Turret’s ball to be rotated. You shouldn’t need to take the screw out entirely. All these parts are labeled in the picture below. The “UP” marker on the ball indicates the top of the camera. You’ll now need to rotate the ball 90 degrees anti-clockwise so that this marker moved from the 12 o’clock to 9 o’clock position. Now, tighten the locking screw back up and replace the trim ring to its original position. The lens should now be appropriately rotated.
For Bullets and Mini Bullets:
The camera models that allow for the easiest rotation of their lenses are bullets and mini bullets.
It is important to note that the sun shield on these cameras cannot be moved to be above the lens when rotated, which presents a drawback so using them for corridor mode. The sun shield will sit to the side of the rotating lens in this case so you’ll need to make sure that you shelter the camera somewhat (such as under the eaves of a roof) if setting a bullet or mini bullet for corridor mode.
Mini bullets have a locking nut (shown below) at the end of their base which will allow you to rotate the camera when loosened. Larger bullets will require you to loosen the locking screw, which is the screw furthest to the right of the base if looking at them (shown below).
Once you’ve loosened the locking screw/nut as appropriate, rotate the main body of the camera 90 degrees anti-clockwise, so that the sun shield is in the 9 o’clock position. This will rotate the lens. Once you’ve done this, tighten the screw or nut again to secure the camera in its newly rotated position.
Part 3: How do I change the layout of my camera streams to accommodate for corridor mode?
Once your camera is all set up in corridor mode, you’ll want to be able to adjust the way that you view the grouped cameras to avoid the camera’s live stream being reduced in size to fit the standardised landscape 16:9 frame. This is easily done by simply merging two of the landscape frames to make a portrait, 9:16 frame to which you can dedicate your camera. This custom view layout can be set up in an NVRs local GUI and in iVMS-4200. Please see the guides below for an explanation on how to customise your stream layout to accommodate corridor mode.
In iVMS-4200:
Click on the small icon made up of several small boxes at the bottom of your Main View screen in the program, this should bring up the window division page. Click Add to create a Custom Window Division.
In the Add Custom Window Division popup, set the name and dimensions of your new stream layout as desired.
Now, click and drag your mouse over the two frames you want to merge to select them both. Once they’ve both been highlighted by a surrounding red box, click Joint to merge them. Now click Save.
Once back in the Main View, click on the Window Division icon in the bottom right-hand corner again and select your new custom layout from the list. Your new stream layout should load ready for you to assign the individual cameras to.
Locally through your NVR’s GUI:
Please Note - This option is only available on NVRs that are running Version 4 firmware. There is not currently an option to customise your stream layout on K-Series recorders. If you're running Version 3 firmware then your only option is to configure your layout as per above in iVMS-4200.
It’s also useful to be able to customise the stream layout as viewed directly from your NVR’s GUI as this is many people’s preferred method for observing and configuring their camera feeds.
To do this, firstly, you’ll need to navigate to:
Configuration > Live View > View > Set Custom Layout (small cog in bottom-left hand corner)
In the Custom Layout Configuration popup, set the name and dimensions of your new stream layout as desired. Now, click and drag your mouse over the two frames you’re going to merge and click the Joint button in the top toolbar, followed by Save.
Once back in the Live View, click on the Split button in the bottom-right hand corner of your screen. Then, select your new custom layout from the Custom Layout list that appears to load your new stream layout. You can then add the camera streams to each frame as appropriate.
You should now be up and running with corridor mode set up properly on your camera! Feel free to start a new thread or comment below with any other questions or suggestions. Thanks for reading!
Attachments
Last edited:
")
