- Messages
- 436
- Points
- 28
How to Set Up Hikvision ANPR
As Hikvision continue to make what was once very specialist and expensive much more accessible in both cost and user-friendliness, we've been fielding far more enquiries regarding ANPR lately. It's a bit "dark-arts" if you're not familiar, and in true Hikvision fashion their documentation can be difficult to find.
Automatic Number Plate Recognition (ANPR), sometimes known as License Plate Recognition (LPR), allows a camera to automatically detect and recognise a car's number plate as it moves through the scene. The camera can take a still / clip of the plate in question, as well as perform an action based on a whitelist / blacklist such as opening an automated gate for example.
This requires a specialised ANPR camera paired with a microSD card, and if you plan on pairing it with an NVR you also need one that can support ANPR functionality. You wouldn't need a microSD card in the camera if you're going to be using an NVR instead. Hikvision's current recommended ANPR cameras are the DS-2CD4A25FWD-IZ(H)(S) Lightfighter bullet and the DS-2CD4A26FWD-IZ(H)(S) Darkfighter bullet, and your best option would be the 8-32mm focal length versions for both as opposed to the 2.8-12mm version. This will provide you a greater level of zoom and thus detail on plates.
All of Hikvision's -E(x) series and -I(x) series NVRs such as the DS-7716NI-I4-16P support ANPR functionality and it continues to improve with each firmware update. These are the two most popular series - if you have a different model or are planning on a different model, please check compatibility before you go ahead!
I've put together a few guides on the process, covering the below topics:
- Setting up a Hikvision ANPR camera
- Setting up a Hikvision ANPR camera with an NVR
- Recommended image parameters
___________________________________________
First of All
Your camera will require specialist firmware to activate the ANPR functionality, as by default it will not have the ANPR-specific firmware. This is a firmware version that isn't publicly released by Hikvision, and so you'll have to contact your seller (hopefully us!) for access to the firmware.
During this demo I'll be using a DS-2CD4A25FWD-IZHS Lightfighter with a DS-7716NI-I4-16P NVR, and at the time of writing the current latest ANPR firmware for this camera is v5.3.8 build 160126.
Update the firmware in the usual method.

Next, reset your device to default settings. The camera will not function properly unless you do so. Navigate to Configuration > Advanced Configuration > System > Maintenance to do so.
Once the device has rebooted and you've reactivated it with a strong password, navigate to Configuration > Advanced Configuration > System > VCA Resource and ensure the Vehicle Detection option is ticked as opposed to Smart Event, and then hit Save. This essentially allocates more resources to Vehicle Detection as opposed to Smart Events, ensuring more reliable ANPR functionality at the expense of Smart Event functionality.
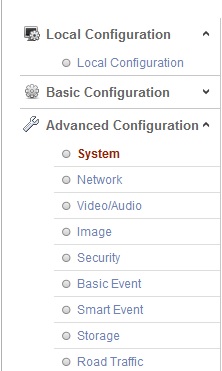

It is absolutely essential you complete the above steps, regardless of how you're planning to configure ANPR afterwards.
___________________________________________
Setting up a Hikvision ANPR camera
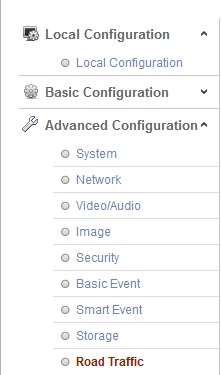
Once you've completed the above steps, log back in to your ANPR camera via a web browser and navigate to Configuration > Advanced Configuration > Road Traffic

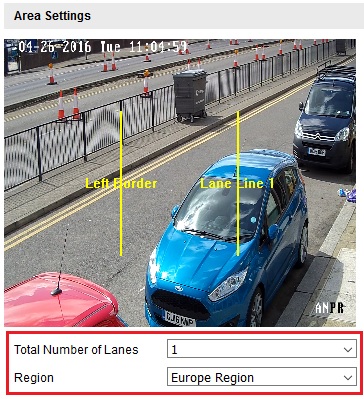
Define the number of lanes you're going to be monitoring and what region the camera is located in. The number of yellow configurable lines on the preview will adjust depending on the selected number of lanes.
NOTE - only one plate can be captured at any one time for each lane
Click and drag the yellow lines to your desired area.
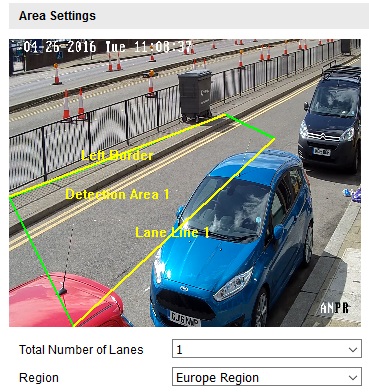
NB: The camera used in the demo is not mounted in an optimal position. Ideally, it'd be facing toward the incoming traffic as much as possible, using a narrow field of view (and thus zoom) to achieve optimal plate recognition. This is just for demo purposes.
Look towards the License Plate Settings just below the detection area configuration.

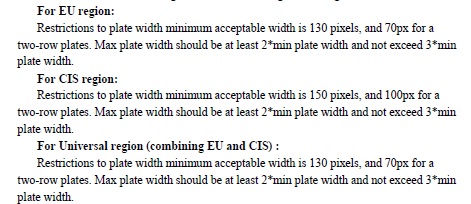
Below are Hikvision's rules regarding pixel width.
Real-time LPR Result will allow you to monitor plates captured by the camera via the web interface which we'll come to in a moment. When enabled, a tab will be visible in which you can view the real-time LPR results.
By default, the Arming Schedule is set to be active 24/7, but this can be configured if required. If you're familiar with Hikvision recording schedules or event arming schedules like motion detection, it's the exact same principle.
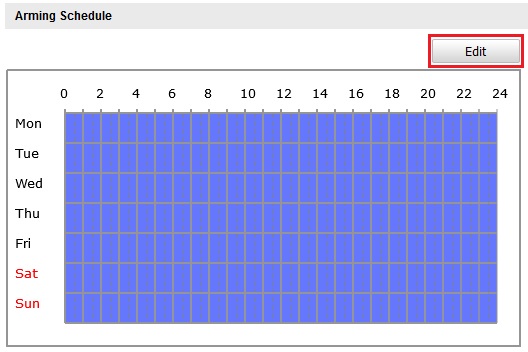
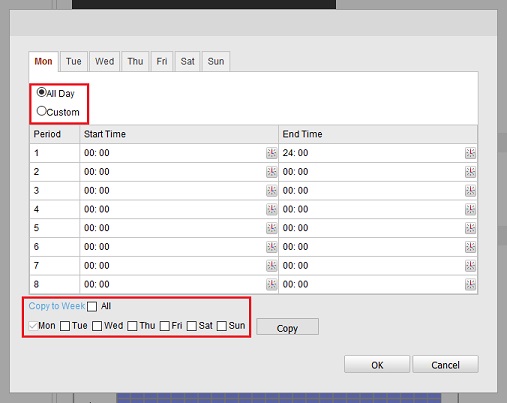

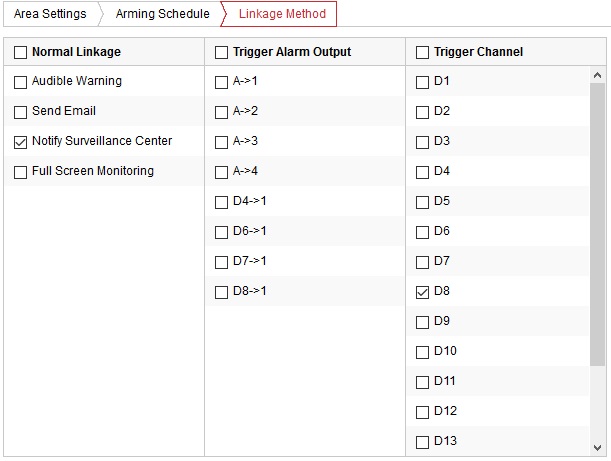
Next, configure the Linkage Method of the camera when a plate is recognised. The camera can alert surveillance center software, such as iVMS 4200 and iVMS 4500, as well as upload the captured still to an FTP server and trigger an alarm output on the camera if one is available.
These can be separately configured for different triggering sources, from a Whitelist, Blacklist or "Other", selectable from the dropdown menu.
Once you're done, hit Save and click on the Picture tab. Within this window, you'll configure the stills taken by the camera whenever a plate is grabbed.

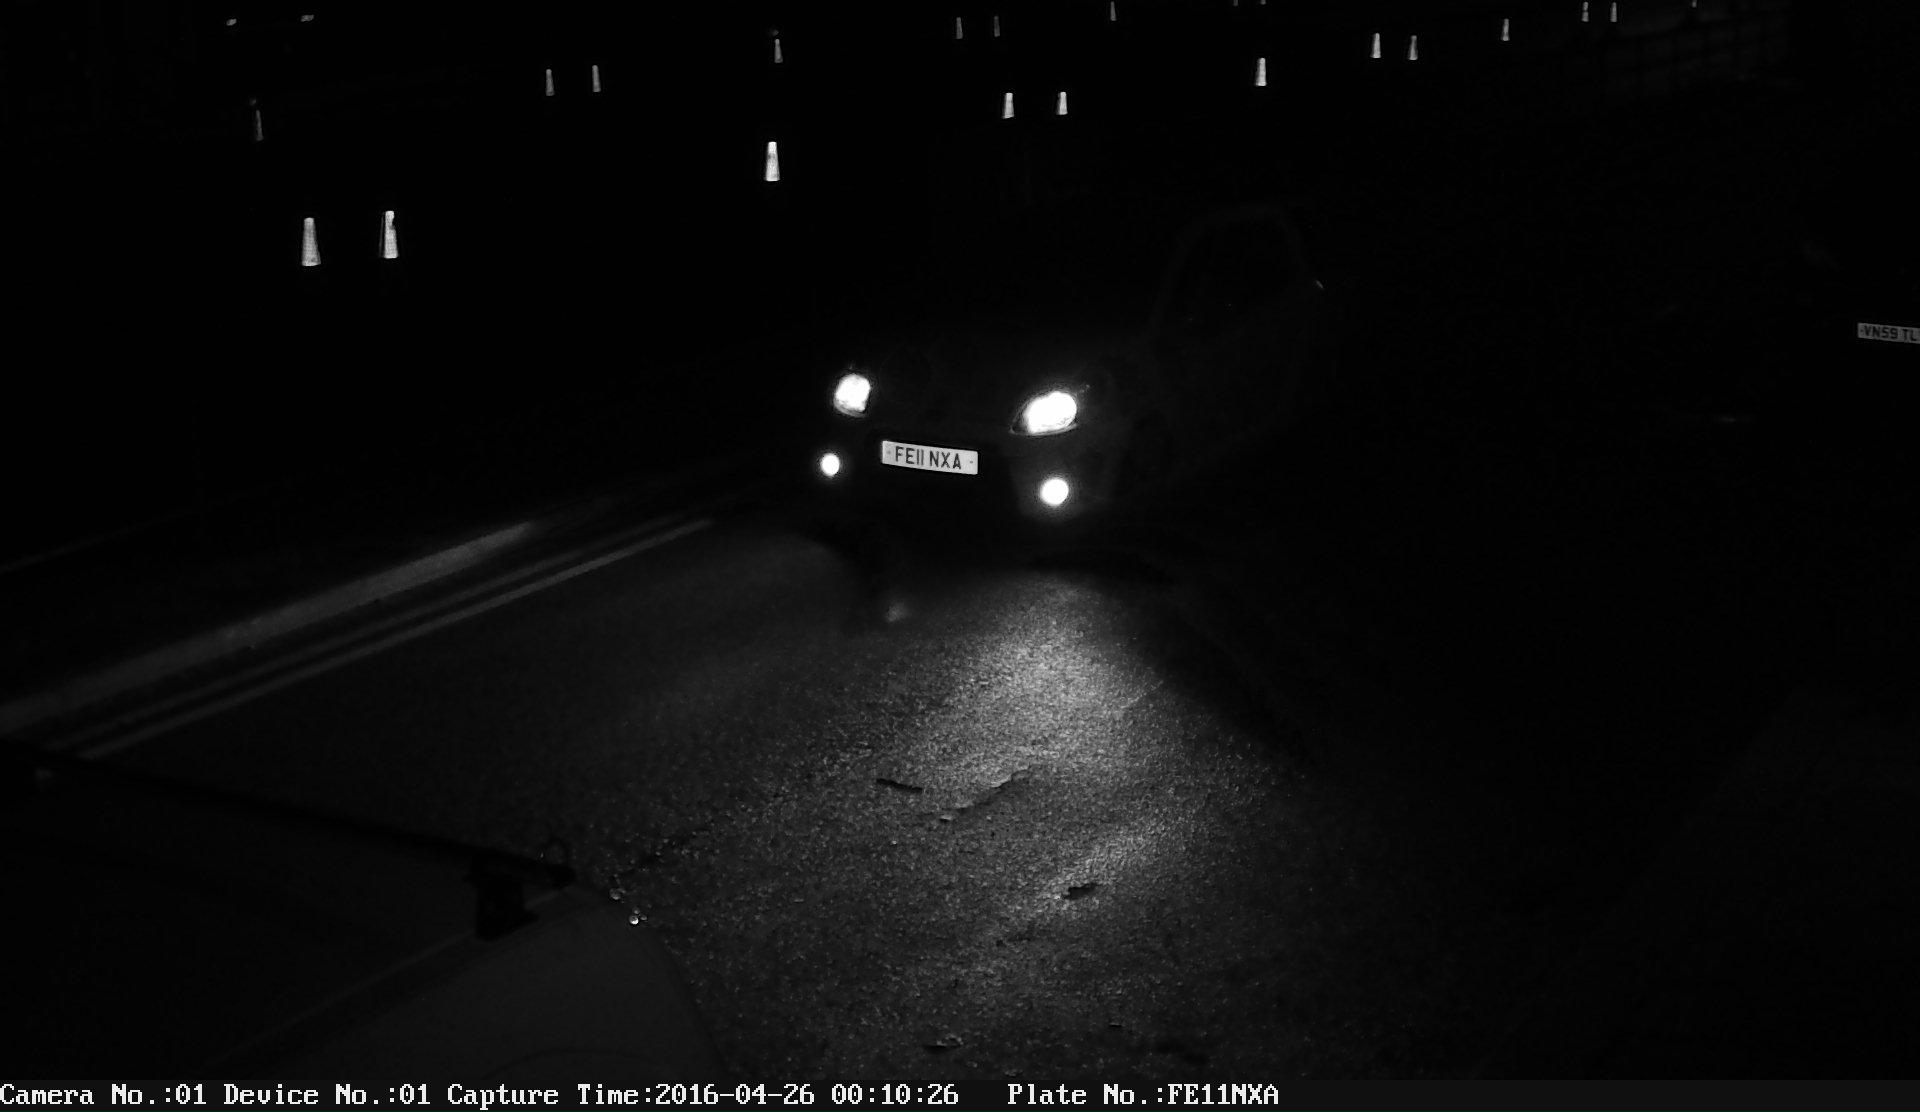
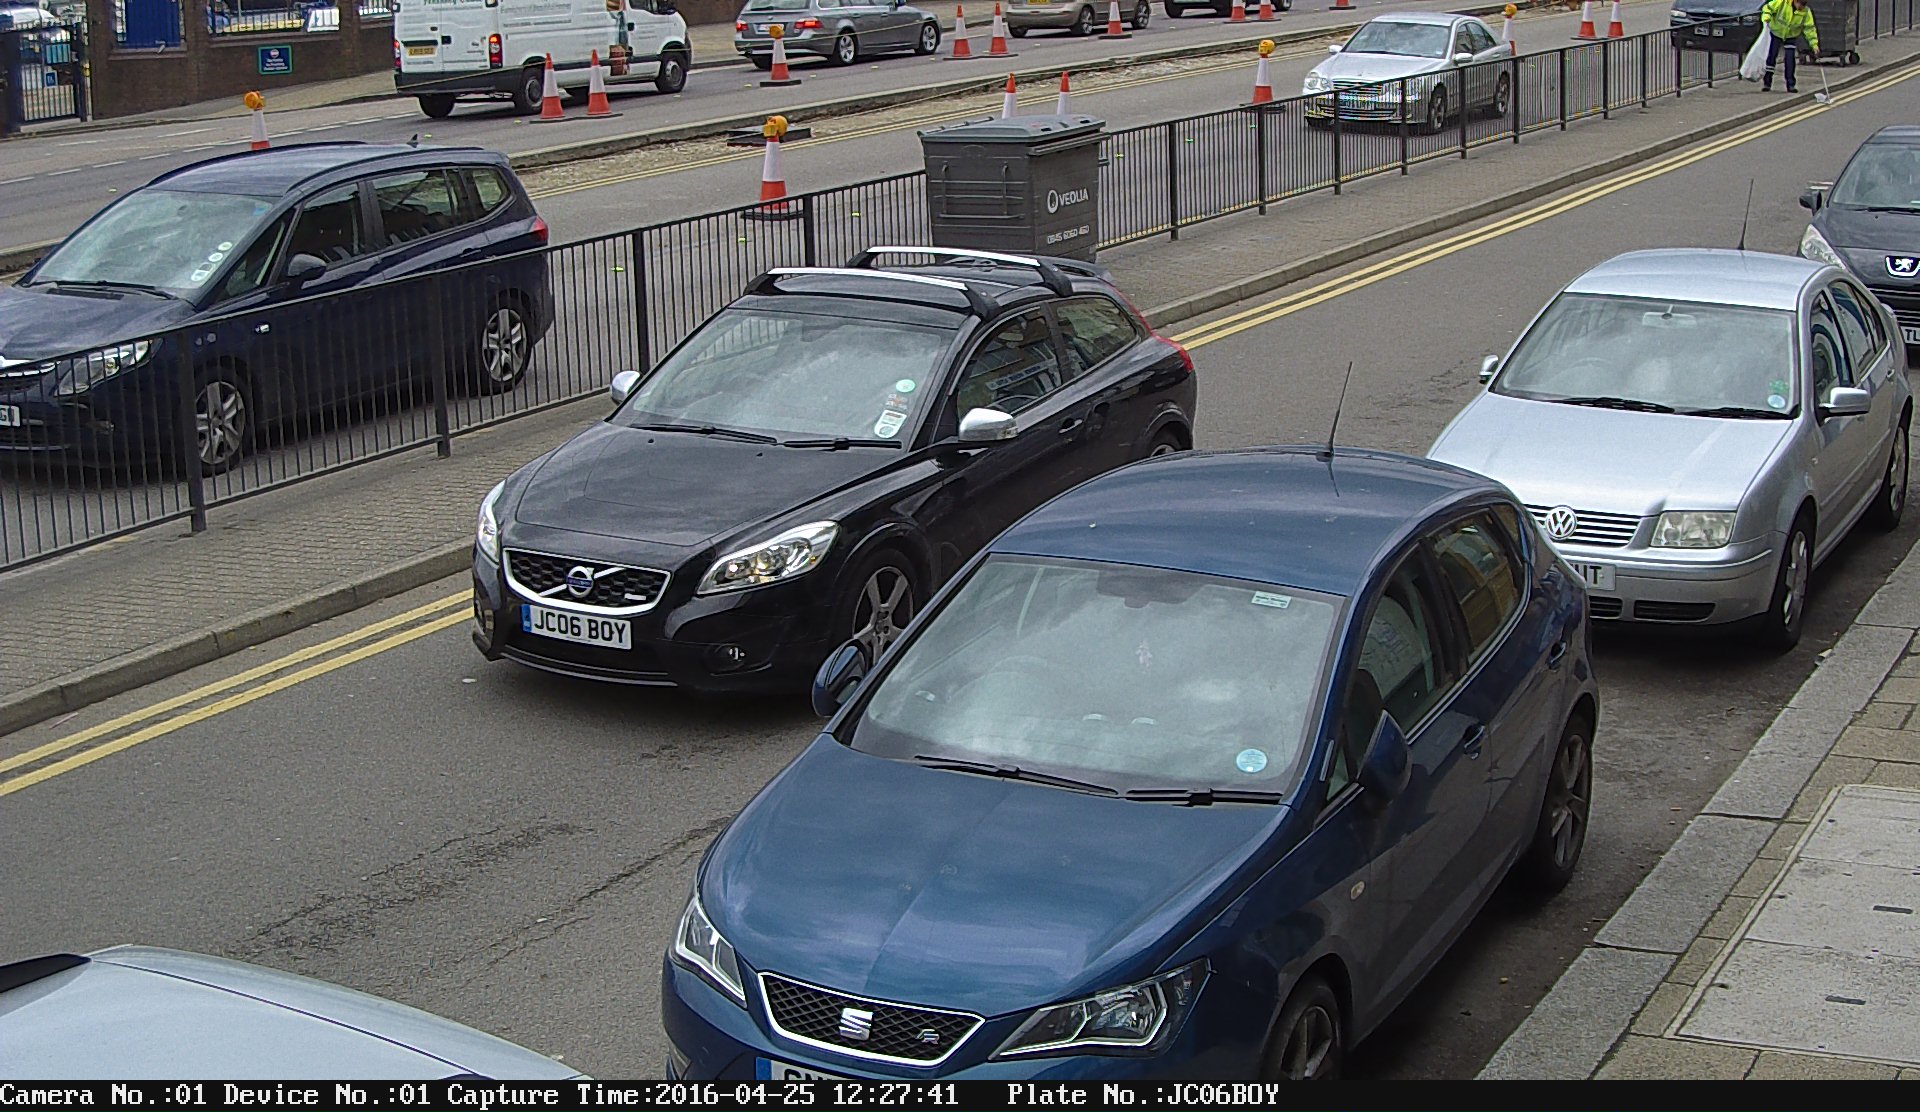
Below this, enable or disable the Text Overlay that accompanies LPR stills. This is a small bar that runs along the bottom of the image (added to the bottom, not covering part of your camera view) which will display the timestamp information of when the still was taken, the actual Plate No. as well as what camera took it etc.
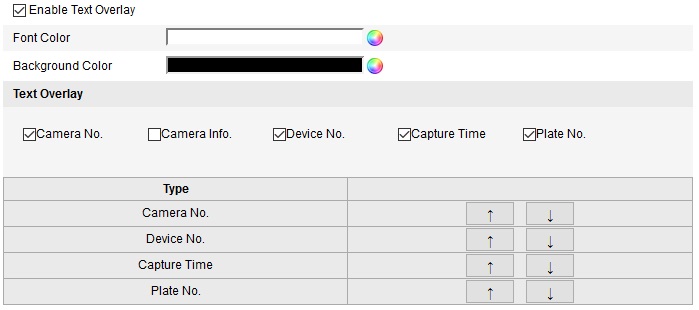
You can customise the font and background colour of the overlay to your own preferences, as well as what information is actually displayed and in what order. In the above example, Camera No. is displayed first and Plate No. comes last.
In a similar fashion, you can dictate the name of the stills uploaded to your FTP server if one such FTP server is available to the camera. By default, the Default option is selected, but you can choose Custom to determine the naming scheme of the captures, similar to the above.
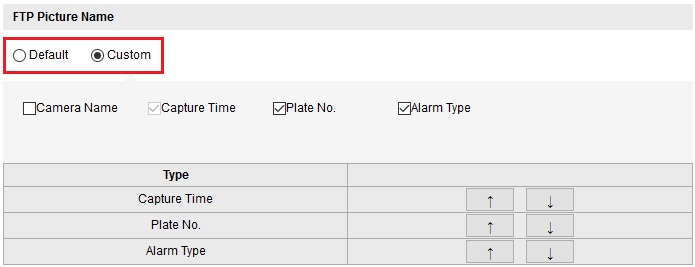
These fields can be filled with whatever you wish.

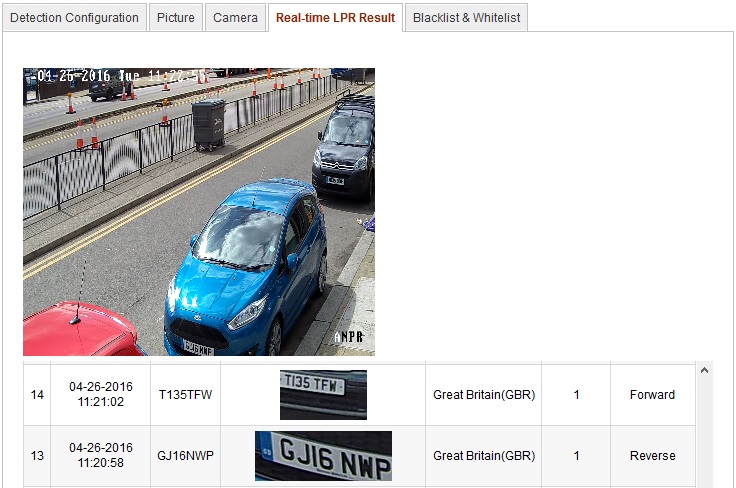
Once again, it displays a preview window of the camera's live stream, and it also displays a preview of the 20 most recently recognised plates as well as some information about them, including the country of origin and the direction they were travelling in.
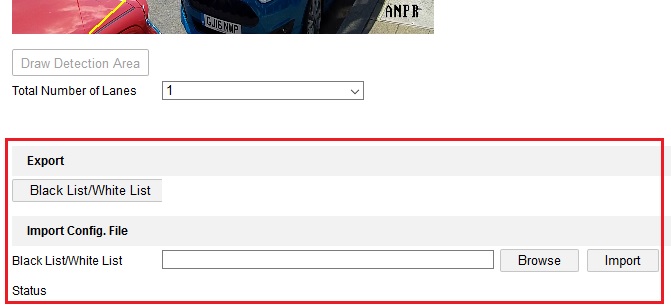
Click on the Blacklist & Whitelist tab. In here is where you'll upload or export a Blacklist & Whitelist file that you would need to create yourself.
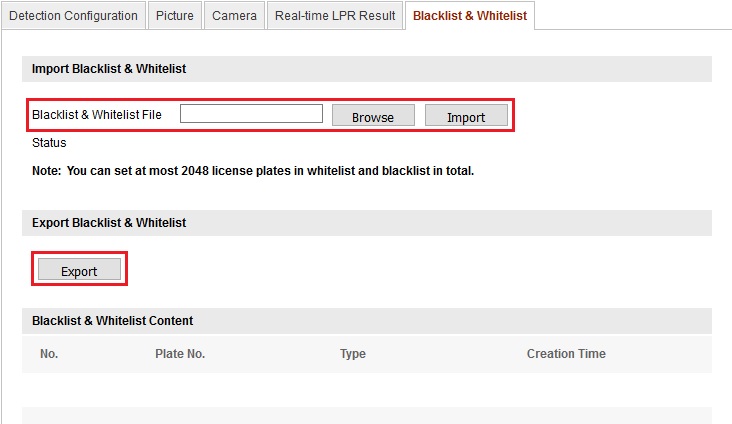
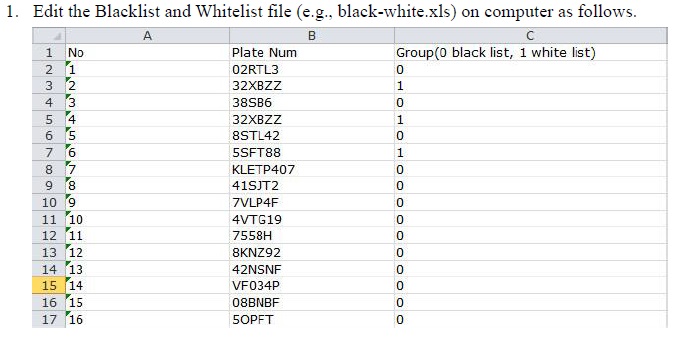
To create a whitelist or blacklist, you would need to upload a .xls spreadsheet file to the camera. Below is an example from Hikvision on how to do so - of course, substitute the plate numbers for your own whitelisted or blacklisted ones, up to a maximum of 2048 license plates.
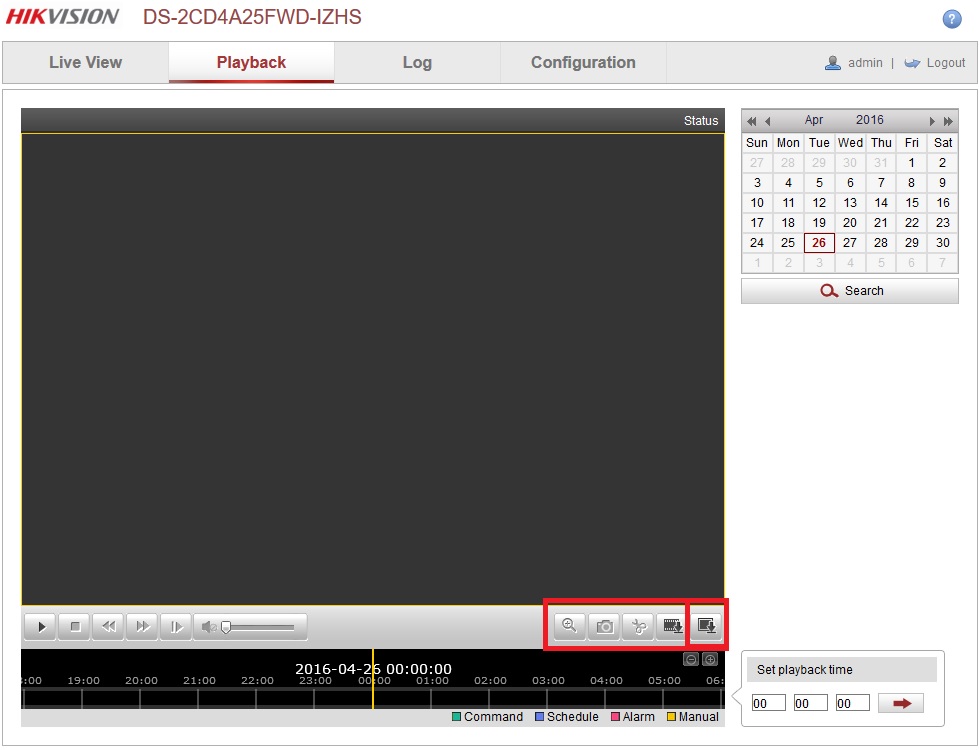
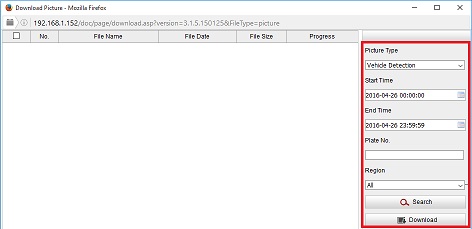
To download and access the captured stills on the microSD card of the camera, navigate to the Playback tab of the camera via a web browser and click on the Download Pictures button.
The process is very similar when configuring via an NVR, but there are a few key differences that we'll cover below, but it's recommended that you complete the above steps on the camera itself before moving on to the NVR as, depending on firmware versions, some configuration options are only available on the camera and must be accessed.
___________________________________________
Setting up a Hikvision ANPR camera via an NVR
Configuring an ANPR camera via an NVR is very similar to the above process, with a few differences which I'll cover below. Mostly, it's a case of a few configuration options that are located in different places, but some are only accessible by the camera itself.
One of the key benefits of using an NVR with an ANPR camera is the ability to simultaneously record footage of cars as they drive past. When searching for captured plates, the NVR will also provide a short clip of the car as it drove past the camera. You can also review footage if an incident occurred and you have a suspected number plate, providing a bit more clarity on what happened as opposed to a still image of the captured plate. This recording is not possible when using an ANPR camera with a microSD card installed.
Like with most things, a Hikvision NVRs own settings will take precedence over the settings on the camera, and so a setting on the NVR will replace the configuration on the camera itself. For the quickest set up, you'd simply configure ANPR as you did above but on the NVRs own configuration options as opposed to the camera. As discussed, this will not allow you to optimise the image parameters of the camera however. I tend to suggest that you configure all the settings you want on the camera, and then do the same on the NVR too, to ensure you've optimised everything as much as possible and avoid the issue of necessary configuration options not being present on an NVR.
If you're connecting your camera directly to the POE ports of an NVR and need to access its configuration options, you would need to activate a feature called Virtual Host I have written an article about here on our forum.
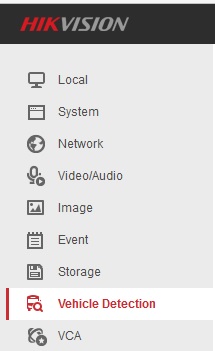
Connect to your NVR via a web browser (it's also possible via a HDMI connection to a monitor) and navigate to Configuration > Vehicle Detection > Vehicle Detection Configuration.
As discussed, the configuration is almost identical to what is described above, which I'd suggest you read first.
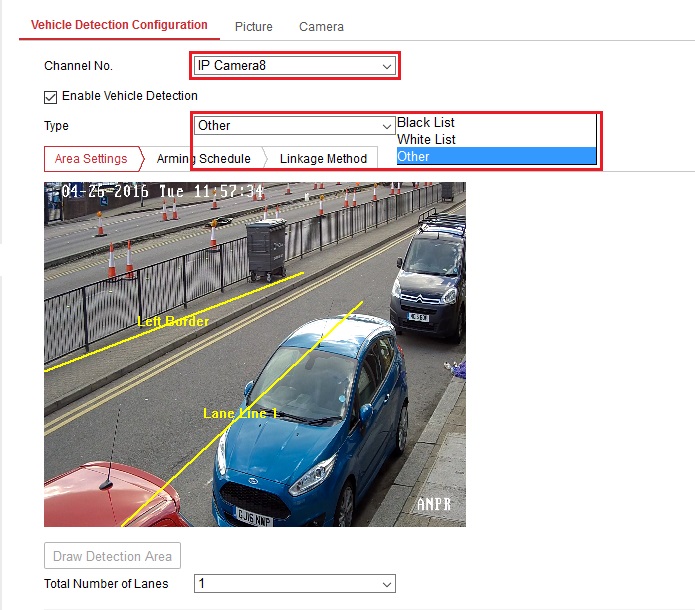
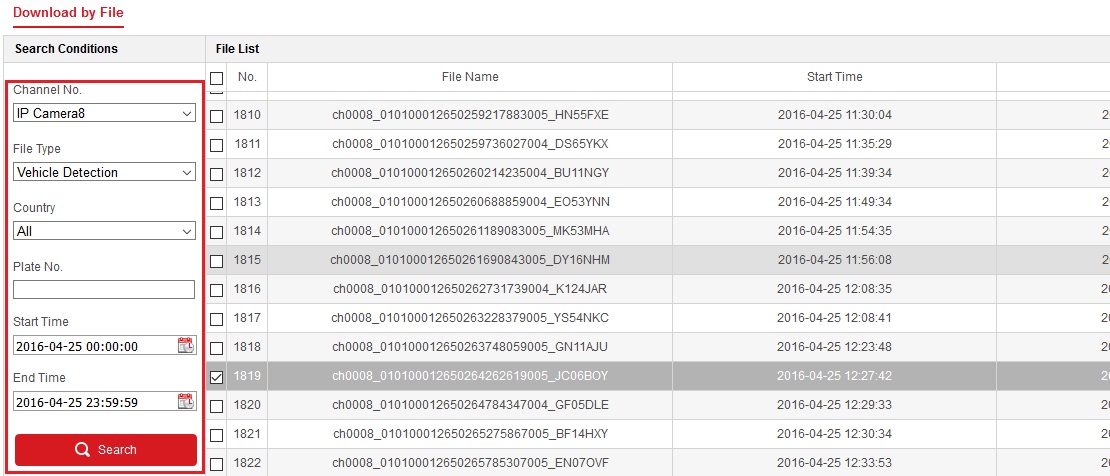
You will need to ensure that you select the appropriate Channel No. from the dropdown menu, as well as what detection type you wish to use (Black List, White List, Other) from the second dropdown menu.
Once again, define the number of lanes and detection area to however you wish.
One of the added benefits of using an NVR is the greater range of Linkage Methods available. The NVR is able to audibly warn you when a plate is triggered, send you an email or activate full screen monitoring of the camera. It can also trigger a great number of alarm outputs, and initiate recording of different cameras too.
Picture / Capture settings and OSD overlay settings are the same. There is no Real-time LPR Result window available to you on the NVR.
To access captured stills of detected plates, you would need to navigate to the Picture tab at the top of the NVRs web access GUI.

Results will be displayed on the right hand side, at which point you can view or download them.
Below are some recommended image parameters from Hikvision to improve detection accuracy, particularly at night.
___________________________________________
Recommended Image Settings for ANPR
It is important that you optimise the image settings of your Hikvision ANPR camera to ensure maximum detection accuracy. You should do this anyway for all of your Hikvision cameras based on their environment, but it's absolutely necessary for an ANPR camera in particular. For example, motion blur can cause a number plate to be too blurry, or a headlight might blind the camera and it won't see the plate unless you take the following steps.
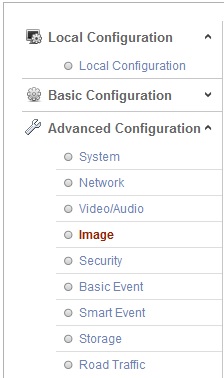
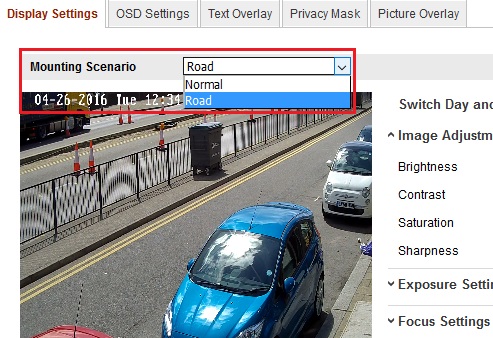
Log into your camera's web browser access, and navigate to Configuration > Advanced Configuration > Image
Changing the Mounting Scenario from Normal to Road via the dropdown menu will automatically configure your camera with Hikvision's recommended image settings for ANPR purposes.
These are covered below, and you can configure them manually too.
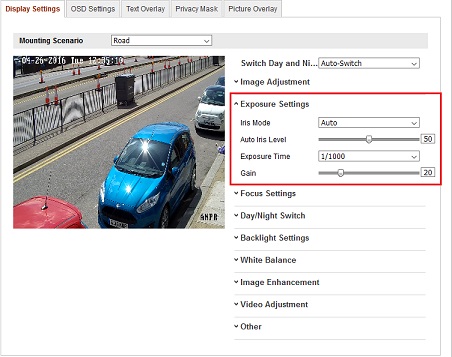
- Iris Mode : Auto
- Auto Iris Level : 50
- Exposure Time : 1/1000
- Gain : 20
- Entrance / Exit : Low speed (<30km/h). Exposure time: 1/150 - 1/200
- Street: Medium speed (30-60km/h). Exposure time: 1/250 - 1/500
- Road: High speed (>60km). Exposure time: 1/500 - 1/1000
Click on the Day/Night Switch menu option on the right.
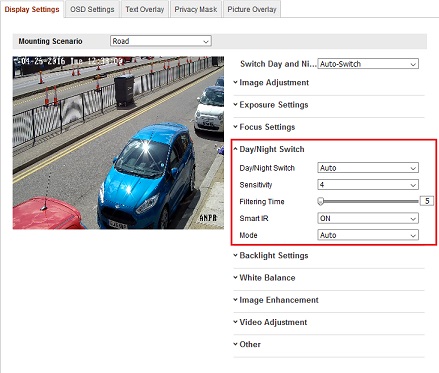
- Day / Night Switch : Auto
- Sensitivity : 4
- Filtering Time : 5
- Smart IR : ON
- Mode : Auto
Typically, an auto switch is fine, but a scheduled switch is also available.
Finally, click on the Backlight Settings menu option.
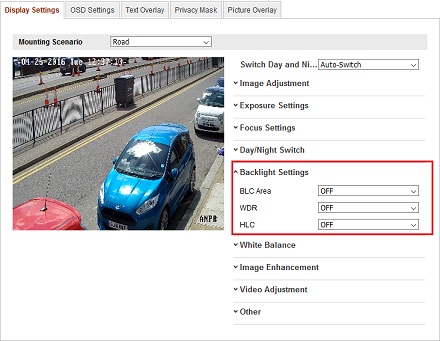
- BLC Area : OFF
- WDR : OFF
The above settings will give you results similar to the below at night. The plate will be visible, but the rest of the image will be too dark to see much.
___________________________________________
That's it, you're done!
Your ANPR camera should be up and running, automatically recognising number plates and storing them to your preferred method.
For the price-point, we've been very impressed with Hikvision's ANPR system, and detection accuracy is fantastic even in troubling installations.
It's relatively easy to set up following the above, but if you do have any questions, feel free to ask here in our forum.
Last edited:

